Stripe is the most popular choice for developers worldwide when it comes to integrating payments. But in India, Stripe has shut down its operations. That leaves Razorpay as the most popular option — and for good reason: it supports UPI, cards, wallets, and net banking, making it the go-to payment gateway in India.
As an Indian developer, I realized there aren’t enough high-quality resources on integrating Razorpay with Next.js (App Router). That’s why I wrote this blog — a clear, production-grade guide that shows you not just the “how” but also the “why” behind each step.
The Big Picture: Why This Architecture?
Before diving into code, let's understand why we need multiple layers of verification:
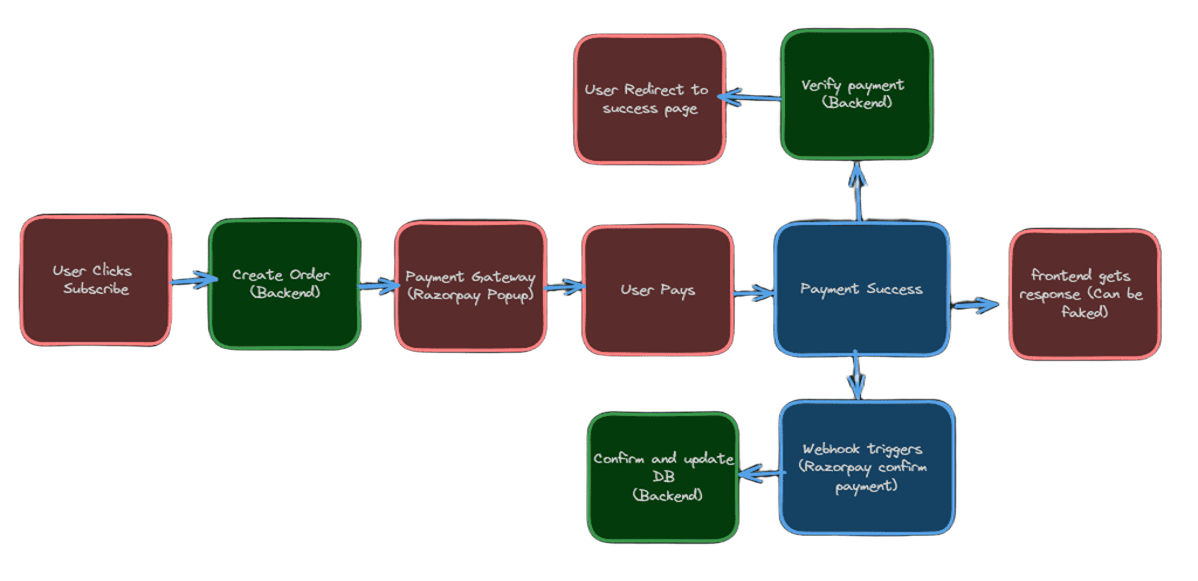
Key principle: Never trust the frontend for payment confirmation. The backend + Razorpay webhook is the bank vault of your system.
Why Both /verify Route AND Webhook? (The Most Asked Question!)
Many developers wonder: "Can't we just use webhooks and skip the /verify route?" Here's why you need both:
The /verify Route: Immediate User Experience
- Validates payment signature using cryptographic verification
- Provides first line of defense against fraud
- Enables immediate UI updates and user feedback
- Acts as a bridge between frontend and backend verification
The Webhook Route: Ultimate Reliability
- Confirms money actually reached Razorpay's account
- Handles background tasks (emails, inventory updates, analytics)
- Provides backup mechanism if verify route fails
- Enables proper retry logic for failed operations
Why You Can't Rely on Just One
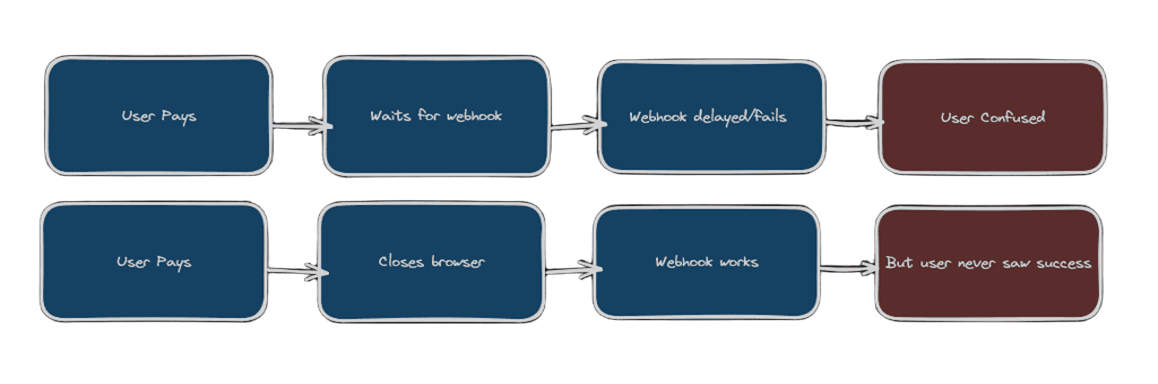
Webhooks Only Problems:
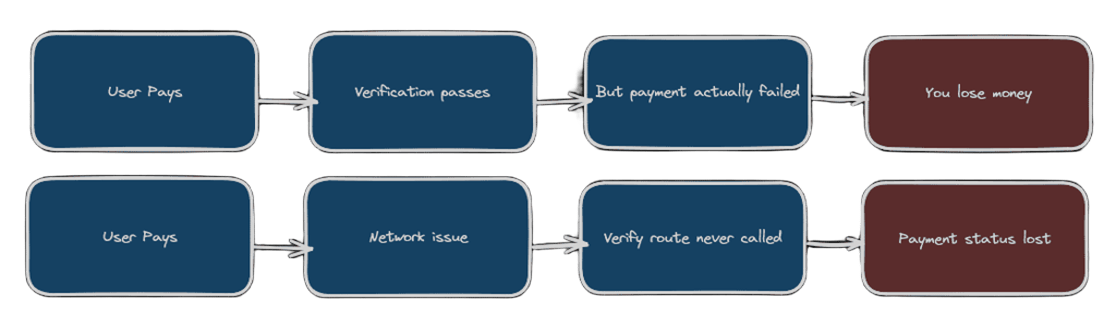
Verify Route Only Problems:
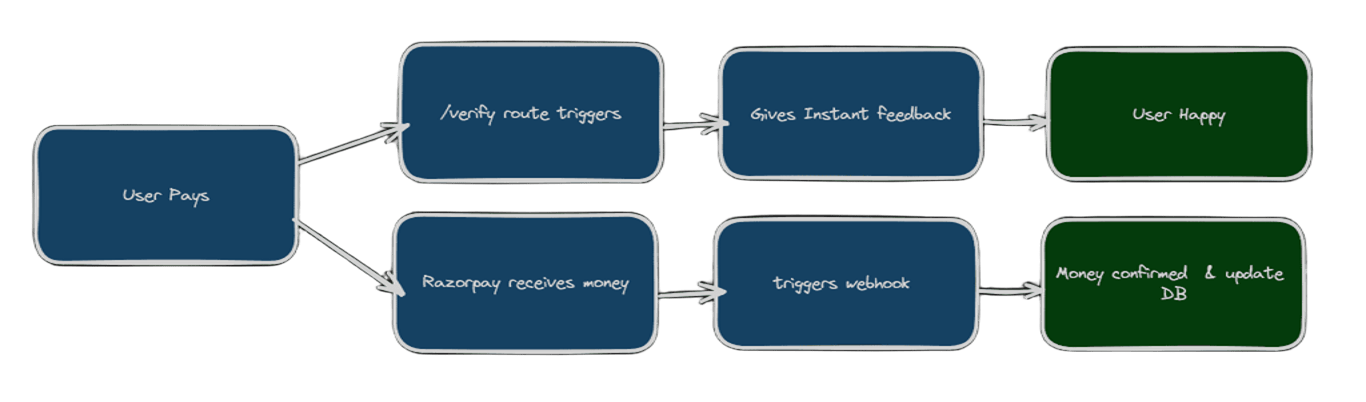
The Perfect Combination:
Step 1: Setting Up Razorpay Account
Head over to Razorpay and create an account.
You'll get two important keys:
- Key ID (public, like your smartphone's name)
- Key Secret (private, like your smartphone's password)
# .env.local
RAZORPAY_KEY_ID=rzp_test_xxxxxxxx
RAZORPAY_KEY_SECRET=your_secret_key_here
NEXT_PUBLIC_RAZORPAY_KEY_ID=rzp_test_xxxxxxxx
RAZORPAY_WEBHOOK_SECRET=your_webhook_secret
Step 2: Install Required Packages
npm install razorpay crypto
razorpay: Official SDK to communicate with Razorpay serverscrypto: Built-in Node.js module for signature verification (security)
Step 3: Database Schema (The Foundation)
Before building the frontend, let's understand what data we need to track and why:
// db/schema.ts
import { pgTable, uuid, varchar, integer, timestamp, boolean } from 'drizzle-orm/pg-core'
import { relations } from 'drizzle-orm'

// Users table - stores user information and subscription status
export const users = pgTable('users', {
  id: uuid('id').primaryKey().defaultRandom(),
  email: varchar('email', { length: 255 }).unique().notNull(),
  name: varchar('name', { length: 255 }).notNull(),
  // Subscription status: 'free', 'premium', 'expired'
  subscriptionStatus: varchar('subscription_status', { length: 20 }).default('free'),
  // When subscription was confirmed via webhook (final confirmation)
  subscriptionConfirmedAt: timestamp('subscription_confirmed_at'),
  createdAt: timestamp('created_at').defaultNow(),
  updatedAt: timestamp('updated_at').defaultNow()
})

// Orders table - tracks every payment attempt (before payment is made)
export const orders = pgTable('orders', {
  id: uuid('id').primaryKey().defaultRandom(),
  userId: uuid('user_id').references(() => users.id).notNull(),
  // Razorpay order ID (unique identifier from Razorpay)
  razorpayOrderId: varchar('razorpay_order_id', { length: 255 }).unique().notNull(),
  // Amount in paise (₹9.99 = 999 paise)
  amount: integer('amount').notNull(),
  // Order status: 'created', 'paid', 'failed'
  status: varchar('status', { length: 20 }).default('created'),
  // Plan information for tracking
  planId: varchar('plan_id', { length: 100 }),
  createdAt: timestamp('created_at').defaultNow(),
  updatedAt: timestamp('updated_at').defaultNow()
})

// Payments table - tracks successful payments only (after money is received)
export const payments = pgTable('payments', {
  id: uuid('id').primaryKey().defaultRandom(),
  orderId: uuid('order_id').references(() => orders.id).notNull(),
  // Razorpay payment ID (unique identifier for each payment)
  razorpayPaymentId: varchar('razorpay_payment_id', { length: 255 }).unique().notNull(),
  amount: integer('amount').notNull(),
  // Preliminary status from /verify route: 'verified', 'pending'
  preliminaryStatus: varchar('preliminary_status', { length: 20 }).default('pending'),
  // Final status from webhook: 'captured', 'failed', 'refunded'
  finalStatus: varchar('final_status', { length: 20 }),
  // Payment method details from Razorpay
  method: varchar('method', { length: 50 }), // 'card', 'upi', 'netbanking', etc.
  // Additional payment details
  cardLast4: varchar('card_last4', { length: 4 }), // Last 4 digits of card
  bankName: varchar('bank_name', { length: 100 }),
  // Webhook confirmation flag
  webhookConfirmed: boolean('webhook_confirmed').default(false),
  createdAt: timestamp('created_at').defaultNow(),
  updatedAt: timestamp('updated_at').defaultNow()
})

// Define relationships between tables for easier querying
export const usersRelations = relations(users, ({ many }) => ({
  orders: many(orders),
}))

export const ordersRelations = relations(orders, ({ one, many }) => ({
  user: one(users, {
    fields: [orders.userId],
    references: [users.id],
  }),
  payments: many(payments),
}))

export const paymentsRelations = relations(payments, ({ one }) => ({
  order: one(orders, {
    fields: [payments.orderId],
    references: [orders.id],
  }),
}))

// Export types for TypeScript
export type User = typeof users.$inferSelect
export type NewUser = typeof users.$inferInsert
export type Order = typeof orders.$inferSelect
export type NewOrder = typeof orders.$inferInsert
export type Payment = typeof payments.$inferSelect
export type NewPayment = typeof payments.$inferInsert
Why separate tables?
- Orders: Every time user clicks "Subscribe," we create an order (even if they don't pay)
- Payments: Only created when money is actually received
- Users: Track subscription status independently
- This separation helps in analytics, refunds, and debugging
Step 4: The Frontend - Subscription Page
// app/subscribe/page.tsx
'use client'

import { useState } from 'react'

export default function SubscribePage() {
  const [loading, setLoading] = useState(false)

  const handleSubscribe = async () => {
    setLoading(true)

    try {
      // STEP 1: Create an order in our database
      const response = await fetch('/api/subscription', {
        method: 'POST',
        headers: {
          'Content-Type': 'application/json',
        },
        body: JSON.stringify({
          planId: 'premium_monthly',
          amount: 999,
        }),
      })

      const data = await response.json()

      if (data.success) {
        // STEP 2: Open Razorpay checkout with the order details
        openRazorpayCheckout(data.order)
      } else {
        alert('Failed to create order: ' + data.error)
      }
    } catch (error) {
      console.error('Subscription failed:', error)
      alert('Something went wrong. Please try again!')
    }

    setLoading(false)
  }

  const openRazorpayCheckout = (order: any) => {
    const options = {
      key: process.env.NEXT_PUBLIC_RAZORPAY_KEY_ID, // Your public key
      amount: order.amount,
      currency: order.currency,
      name: 'Your Awesome App',
      description: 'Premium Subscription',
      order_id: order.id, // The order ID from Razorpay

      // CRITICAL: This handler runs when user completes payment
      handler: async function (response: any) {
        console.log('Payment response:', response)
        // WHY verify? Because this response can be faked by hackers!
        await verifyPayment(response)
      },

      prefill: {
        name: 'John Doe',
        email: 'john@example.com',
        contact: '9999999999',
      },

      theme: {
        color: '#3399cc',
      },
    }

    const rzp = new (window as any).Razorpay(options)
    rzp.open()
  }

  const verifyPayment = async (response: any) => {
    try {
      // STEP 3: Verify payment on our backend
      const verifyResponse = await fetch('/api/subscription/verify', {
        method: 'POST',
        headers: {
          'Content-Type': 'application/json',
        },
        body: JSON.stringify({
          razorpay_order_id: response.razorpay_order_id,
          razorpay_payment_id: response.razorpay_payment_id,
          razorpay_signature: response.razorpay_signature, // This proves authenticity
        }),
      })

      const result = await verifyResponse.json()

      if (result.success) {
        // Payment verified! Redirect to success page
        window.location.href = '/success'
      } else {
        alert('Payment verification failed: ' + result.error)
      }
    } catch (error) {
      console.error('Verification failed:', error)
      alert('Payment verification failed!')
    }
  }

  return (
    <div className="min-h-screen flex items-center justify-center bg-gray-100">
      <div className="bg-white p-8 rounded-lg shadow-md max-w-md w-full">
        <h1 className="text-2xl font-bold text-center mb-6">
          Choose Your Plan
        </h1>

        <div className="border rounded-lg p-6 mb-6">
          <h2 className="text-xl font-semibold mb-2">Premium Monthly</h2>
          <p className="text-gray-600 mb-4">
            Access all premium features
          </p>
          <div className="text-3xl font-bold mb-4">
            ₹9.99 <span className="text-sm font-normal">/month</span>
          </div>

          <button
            onClick={handleSubscribe}
            disabled={loading}
            className="w-full bg-blue-600 text-white py-2 px-4 rounded-lg hover:bg-blue-700 disabled:opacity-50"
          >
            {loading ? 'Processing...' : 'Subscribe Now'}
          </button>
        </div>
      </div>

      {/*To access Razorpay's payment interface */}
      <script src="https://checkout.razorpay.com/v1/checkout.js"></script>
    </div>
  )
}
Why this structure? This structure is designed to make the payment flow both smooth for the user and easier to maintain as a developer. A loading state ensures users don’t click the payment button multiple times while the process is still running, preventing duplicate actions. Proper error handling means that instead of the app crashing or showing confusing errors, users see clear and friendly messages when something goes wrong. And by keeping functions separate, with each handling just one responsibility, the code becomes cleaner, easier to debug, and simpler to extend in the future.
Step 5: Backend - Creating Orders (/api/subscription/route.ts)
// app/api/subscription/route.ts
import { NextRequest, NextResponse } from 'next/server'
import Razorpay from 'razorpay'
import { db, schema } from '@/db'

// STEP 1: Initialize Razorpay instance with credentials
const razorpay = new Razorpay({
  key_id: process.env.RAZORPAY_KEY_ID!,
  key_secret: process.env.RAZORPAY_KEY_SECRET!,
})

export async function POST(request: NextRequest) {
  try {
    // STEP 2: Parse and validate request body
    const { planId, amount, userId } = await request.json()

    // STEP 3: Input validation
    if (!planId || !amount || amount <= 0) {
      return NextResponse.json(
        { success: false, error: 'Invalid plan or amount' },
        { status: 400 }
      )
    }

    // STEP 4: Validate amount against plan (security measure)
    const validPlans = {
      'premium_monthly': 999, // ₹9.99 in paise
      'premium_yearly': 9999, // ₹99.99 in paise
    }

    if (validPlans[planId as keyof typeof validPlans] !== amount) {
      return NextResponse.json(
        { success: false, error: 'Invalid amount for selected plan' },
        { status: 400 }
      )
    }

    // STEP 5: Create order in Razorpay first
    const razorpayOrder = await razorpay.orders.create({
      amount: amount, // amount in paise
      currency: 'INR',
      receipt: `receipt_${Date.now()}_${planId}`, // unique receipt for tracking
      notes: {
        planId: planId,
        userId: userId || 'guest', // In production, get from authenticated session
        createdBy: 'subscription_flow'
      },
    })

    // STEP 6: Save order to database using Drizzle
    // WHY after Razorpay? Only save if Razorpay order creation succeeds
    const [newOrder] = await db
      .insert(schema.orders)
      .values({
        userId: userId || 'temp_user_id', // In production: get from JWT/session
        razorpayOrderId: razorpayOrder.id,
        amount: amount,
        status: 'created',
        planId: planId,
      })
      .returning()

    // STEP 7: Log successful order creation
    console.log('Order created successfully:', {
      orderId: newOrder.id,
      razorpayOrderId: razorpayOrder.id,
      amount: amount,
      planId: planId
    })

    // STEP 8: Return order details to frontend
    return NextResponse.json({
      success: true,
      order: {
        id: razorpayOrder.id,
        amount: razorpayOrder.amount,
        currency: razorpayOrder.currency,
        key: process.env.NEXT_PUBLIC_RAZORPAY_KEY_ID,
      },
    })

  } catch (error) {
    console.error('Order creation failed:', {
      error: error instanceof Error ? error.message : 'Unknown error',
      stack: error instanceof Error ? error.stack : undefined,
      timestamp: new Date().toISOString()
    })

    return NextResponse.json(
      { success: false, error: 'Failed to create order. Please try again.' },
      { status: 500 }
    )
  }
}
When integrating Razorpay, it’s important to create an order first before moving to the checkout stage. This step isn’t just a formality—it plays a key role in ensuring secure and reliable payments. Every order generated comes with a unique ID, which helps prevent duplicate transactions and accidental double charges. It also locks in the payment amount, so Razorpay can verify that the user pays exactly what was intended, eliminating mismatches. On top of that, orders act as an audit trail, letting you track every payment attempt, whether successful or failed. Finally, because the order details are signed and verified by Razorpay, they can’t be tampered with, adding an extra layer of security to the entire process.
Step 6: Payment Verification - The Critical Step (/api/subscription/verify/route.ts)
This is the most important part. Let me explain why we can't trust frontend responses:
The Problem: A hacker could:
- Open browser developer tools
- Fake a successful payment response
- Get premium access without paying
The Solution: Cryptographic signature verification
- Razorpay creates a signature using:
order_id|payment_id + secret_key - We recreate the same signature using our secret key
- If signatures match → Payment is genuine
- If signatures don't match → Someone is trying to hack
// app/api/subscription/verify/route.ts

import { NextRequest, NextResponse } from 'next/server'
import crypto from 'crypto'
import { db, schema } from '@/db'
import { eq } from 'drizzle-orm'

export async function POST(request: NextRequest) {
  try {
    // STEP 1: Extract payment details from request body
    const {
      razorpay_order_id,
      razorpay_payment_id,
      razorpay_signature,
    } = await request.json()

    // STEP 2: Input validation
    if (!razorpay_order_id || !razorpay_payment_id || !razorpay_signature) {
      return NextResponse.json(
        { success: false, error: 'Missing required payment parameters' },
        { status: 400 }
      )
    }

    // STEP 3: Find the order in our database using Drizzle
    const [orderRecord] = await db
      .select()
      .from(schema.orders)
      .where(eq(schema.orders.razorpayOrderId, razorpay_order_id))
      .limit(1)

    if (!orderRecord) {
      console.error('Order not found:', razorpay_order_id)
      return NextResponse.json(
        { success: false, error: 'Order not found' },
        { status: 404 }
      )
    }

    // STEP 4: Check if payment already processed
    const [existingPayment] = await db
      .select()
      .from(schema.payments)
      .where(eq(schema.payments.razorpayPaymentId, razorpay_payment_id))
      .limit(1)

    if (existingPayment) {
      console.log('Payment already processed:', razorpay_payment_id)
      return NextResponse.json({
        success: true,
        message: 'Payment already verified',
      })
    }

    // STEP 5: Cryptographic signature verification
    const body = razorpay_order_id + '|' + razorpay_payment_id
    const expectedSignature = crypto
      .createHmac('sha256', process.env.RAZORPAY_KEY_SECRET!)
      .update(body.toString())
      .digest('hex')

    // STEP 6: Compare signatures using secure comparison
    const isAuthentic = crypto.timingSafeEqual(
      Buffer.from(expectedSignature, 'hex'),
      Buffer.from(razorpay_signature, 'hex')
    )

    if (!isAuthentic) {
      console.error('Invalid payment signature detected:', {
        orderId: razorpay_order_id,
        paymentId: razorpay_payment_id,
        expected: expectedSignature,
        received: razorpay_signature,
        timestamp: new Date().toISOString()
      })

      return NextResponse.json(
        { success: false, error: 'Invalid payment signature' },
        { status: 400 }
      )
    }

    console.log('Payment signature verified:', razorpay_payment_id)

    // STEP 8: Begin database transaction for atomic updates
    await db.transaction(async (tx) => {

      // STEP 9: Update order status to 'paid'
      await tx
        .update(schema.orders)
        .set({
          status: 'paid',
          updatedAt: new Date()
        })
        .where(eq(schema.orders.razorpayOrderId, razorpay_order_id))

      // STEP 10: Create payment record with preliminary verification
      // WHY preliminary? Webhook will provide final confirmation
      await tx
        .insert(schema.payments)
        .values({
          orderId: orderRecord.id,
          razorpayPaymentId: razorpay_payment_id,
          amount: orderRecord.amount,
          preliminaryStatus: 'verified', // Verified by signature
          finalStatus: null, // Will be set by webhook
          webhookConfirmed: false, // Will be true when webhook processes
        })

      // STEP 11: Give user immediate premium access
      await tx
        .update(schema.users)
        .set({
          subscriptionStatus: 'premium',
          updatedAt: new Date()
        })
        .where(eq(schema.users.id, orderRecord.userId))

    }) // End transaction

    // STEP 12: Log successful verification
    console.log('Payment verification completed:', {
      orderId: orderRecord.id,
      userId: orderRecord.userId,
      amount: orderRecord.amount,
      status: 'preliminary_confirmed'
    })

    // STEP 13: Return success response to frontend
    return NextResponse.json({
      success: true,
      message: 'Payment verified successfully',
      paymentId: razorpay_payment_id,
    })

  } catch (error) {
    console.error('Payment verification failed:', {
      error: error instanceof Error ? error.message : 'Unknown error',
      stack: error instanceof Error ? error.stack : undefined,
      timestamp: new Date().toISOString(),
    })

    return NextResponse.json(
      { success: false, error: 'Payment verification failed. Please contact support.' },
      { status: 500 }
    )
  }
}
Step 7: Success Page (/app/success/page.tsx)
// app/success/page.tsx
export default function SuccessPage() {
  return (
    <div className="min-h-screen flex items-center justify-center bg-green-50">
      <div className="bg-white p-8 rounded-lg shadow-md max-w-md w-full text-center">
        <div className="text-green-500 text-6xl mb-4">✓</div>
        <h1 className="text-2xl font-bold text-gray-800 mb-4">
          Payment Successful!
        </h1>
        <p className="text-gray-600 mb-6">
          Welcome to Premium! Your subscription is now active.
        </p>
        <button
          onClick={() => window.location.href = '/dashboard'}
          className="bg-green-600 text-white py-2 px-6 rounded-lg hover:bg-green-700"
        >
          Go to Dashboard
        </button>
      </div>
    </div>
  )
}
Step 8: Webhooks - The Safety Net (/api/webhook/route.ts)
What is a webhook? Think of it as a phone call from Razorpay to your server saying: "Hey, I just received money from user X!"
Why do we need webhooks even after verification? Even after signature verification, there are still edge cases:
Scenario 1: What if...
- User pays successfully
- Our verification passes
- We update user to premium
- BUT Razorpay's payment processing fails
- Money never reaches our account
Result: User gets premium access, but we never got paid!
Scenario 2: Network issues
- User pays successfully
- Network fails before verification
- Payment status never updated
Result: User paid but didn't get premium access!
Webhook solves this:
- Webhook only triggers when Razorpay actually receives money
- It's the final confirmation that everything worked
- It handles edge cases our verification might miss
- It works even when your main app is temporarily down
// app/api/webhook/route.ts
import { NextRequest, NextResponse } from 'next/server'
import crypto from 'crypto'
import { db, schema } from '@/db'
import { eq, and } from 'drizzle-orm'

export async function POST(request: NextRequest) {
  try {
    // STEP 1: Extract webhook payload and signature
    const body = await request.text()
    const signature = request.headers.get('x-razorpay-signature')

    if (!signature) {
      console.error('No webhook signature provided')
      return NextResponse.json({ error: 'No signature' }, { status: 400 })
    }

    // STEP 2: Verify webhook authenticity using HMAC
    const expectedSignature = crypto
      .createHmac('sha256', process.env.RAZORPAY_WEBHOOK_SECRET!)
      .update(body)
      .digest('hex')

    // STEP 3: Secure signature comparison
    const isAuthentic = crypto.timingSafeEqual(
      Buffer.from(signature, 'hex'),
      Buffer.from(expectedSignature, 'hex')
    )

    if (!isAuthentic) {
      console.error('Invalid webhook signature:', {
        received: signature,
        expected: expectedSignature,
        timestamp: new Date().toISOString()
      })
      return NextResponse.json({ error: 'Invalid signature' }, { status: 400 })
    }

    console.log('Webhook signature verified')

    // STEP 4: Parse webhook event data
    const event = JSON.parse(body)
    console.log('Webhook event received:', event.event)

    // STEP 5: Handle different webhook events
    switch (event.event) {
      case 'payment.captured':
        // Money successfully received by Razorpay
        await handlePaymentSuccess(event.payload.payment.entity)
        break

      case 'payment.failed':
        // Payment failed after user attempted
        await handlePaymentFailure(event.payload.payment.entity)
        break

      case 'order.paid':
        // Order completed successfully
        await handleOrderCompletion(event.payload.order.entity)
        break

      case 'payment.refunded':
        // User requested refund
        await handlePaymentRefund(event.payload.refund.entity)
        break

      default:
        console.log('ℹUnhandled webhook event:', event.event)
    }

    // STEP 6: Always return 200 to Razorpay
    return NextResponse.json({ success: true })

  } catch (error) {
    // STEP 7: Error handling - but still return 200 to prevent retries
    console.error('Webhook processing failed:', {
      error: error instanceof Error ? error.message : 'Unknown error',
      stack: error instanceof Error ? error.stack : undefined,
      timestamp: new Date().toISOString()
    })

    // WHY return 200 on error? Prevent Razorpay from retrying endlessly
    return NextResponse.json(
      { error: 'Webhook processing failed' },
      { status: 200 }
    )
  }
}

// STEP 8: Handle successful payment capture
async function handlePaymentSuccess(payment: any) {
  console.log('Processing payment success:', payment.id)

  try {
    // STEP 9: Check if payment already processed (idempotency)
    // WHY check? Webhooks might be sent multiple times
    const [existingPayment] = await db
      .select()
      .from(schema.payments)
      .where(
        and(
          eq(schema.payments.razorpayPaymentId, payment.id),
          eq(schema.payments.webhookConfirmed, true)
        )
      )
      .limit(1)

    if (existingPayment) {
      console.log('Payment already processed via webhook:', payment.id)
      return
    }

    // STEP 10: Begin transaction for atomic updates
    await db.transaction(async (tx) => {

      // STEP 11: Update payment record with final confirmation
      await tx
        .update(schema.payments)
        .set({
          finalStatus: 'captured', // Final confirmation from Razorpay
          webhookConfirmed: true, // Webhook processed
          method: payment.method, // Payment method (card/upi/netbanking)
          cardLast4: payment.card?.last4 || null, // Card details if card payment
          bankName: payment.bank || null, // Bank name if applicable
          updatedAt: new Date()
        })
        .where(eq(schema.payments.razorpayPaymentId, payment.id))

      // STEP 12: Find the associated order
      const [paymentRecord] = await tx
        .select({
          orderId: schema.payments.orderId,
          order: schema.orders
        })
        .from(schema.payments)
        .innerJoin(schema.orders, eq(schema.payments.orderId, schema.orders.id))
        .where(eq(schema.payments.razorpayPaymentId, payment.id))
        .limit(1)

      if (!paymentRecord) {
        throw new Error('Payment record not found after update')
      }

      // STEP 13: Final user subscription confirmation
      await tx
        .update(schema.users)
        .set({
          subscriptionStatus: 'premium',
          subscriptionConfirmedAt: new Date(), // Mark when finally confirmed
          updatedAt: new Date()
        })
        .where(eq(schema.users.id, paymentRecord.order.userId))

    }) // End transaction

    // STEP 14: Post-payment processing (outside transaction)
    try {
      // Send welcome email
      await sendWelcomeEmail(paymentRecord.order.userId)
      console.log('Post-payment tasks completed')
    } catch (postProcessError) {
      console.error('Post-payment processing failed:', postProcessError)
    }

    console.log('Payment success handling completed:', {
      paymentId: payment.id,
      amount: payment.amount,
      method: payment.method,
      timestamp: new Date().toISOString()
    })

  } catch (error) {
    console.error('Failed to process payment success:', {
      paymentId: payment.id,
      error: error instanceof Error ? error.message : 'Unknown error',
      stack: error instanceof Error ? error.stack : undefined
    })

    // WHY throw error? This will mark the webhook as failed for retry
    throw error
  }
}
How webhooks work:
- User pays → Razorpay processes payment
- Payment succeeds → Razorpay receives money in their account
- Webhook triggers → Razorpay sends HTTP POST to your webhook URL
- Your server processes → Updates database, sends emails, etc.
- You respond with 200 → Razorpay knows you received the webhook
Testing Your Integration
Razorpay provides test cards:
Success: 4111 1111 1111 1111
Failure: 4000 0000 0000 0002
Expired: Use past date
Invalid CVV: Use 1234
Production Deployment Checklist
Before Going Live:
- [ ] Switch to Razorpay live keys
- [ ] Set up proper SSL certificates
- [ ] Configure production webhook URL
- [ ] Test with real bank accounts (small amounts)
- [ ] Configure error tracking (Sentry, etc.)
Webhook Setup in Production:
- Razorpay Dashboard: Go to Settings → Webhooks
- Add Webhook URL:
https://yourdomain.com/api/webhook - Set Secret: Generate strong webhook secret
- Test: Use Razorpay's webhook test feature
The beauty of this system is that it's both secure and user-friendly. Users get a smooth experience, while you get bulletproof fraud protection.
Happy coding, and may your payments always be secure!